People who enjoy digital photography as a creative outlet are very familiar with software products from companies like Adobe, Corel, ACD Systems, Bibble Labs, Light Crafts, and even Google. Most of them are also likely familiar with what until recently was the premier open source photo editor, the Gimp. Unfortunately, the Gimp has lacked a very important feature for a lot of photographers, 16 bit per channel editing. Because of that, most serious photographers do not consider the Gimp a viable alternative. True, there is also Cinepaint, which forked off of the Gimp a few years ago, and it does offer 16 bit per channel editing. Unfortunately, its interface leaves a lot to be desired and does not seem to be heavily maintained.

Happily, there is now another open source alternative with 16 bit mode editing capabilities which appears to be getting ready to give the big guys a run for their money – digiKam. I have personally only recently discovered digiKam. Well, I had tried it before, but only since I tried its KDE4 edition did I think it was ready for my use. I was actually quite surprised to see how much it has improved and how many features have been included with it. Some of its features are:

  • 16 bit per channel support.
  • Curves and levels tools.
  • Color management support.
  • White balance tool with color picker.
  • Lens correction tools.
  • Aspect Ratio Crop tool with several standard formats available.
  • Proper black & white conversion tool.
  • Batch processing.
  • Tagging and searching features.
  • Export to Facebook, Flickr, Picasa, etc.

And there are many, many more that I just don’t have time to even mention. Of course, digiKam is not perfect. And there are a couple of items that I expect to be improved or corrected soon. But, I assure you that if you are into photography, you are going to be hearing a lot more about digiKam in the future and, hopefully, you will be enjoying its use too.

Now, allow me to take you trough a quick tour of what it is like to work in digiKam. I am currently using digiKam version 1.0.0-beta4 as found in PCLinuxOS KDE4 repositories.

RAW Editing

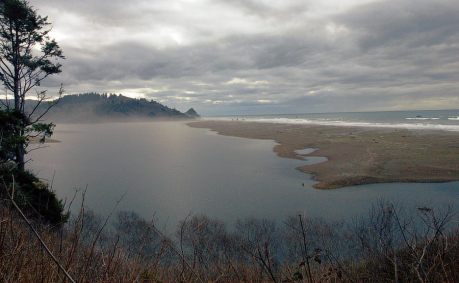
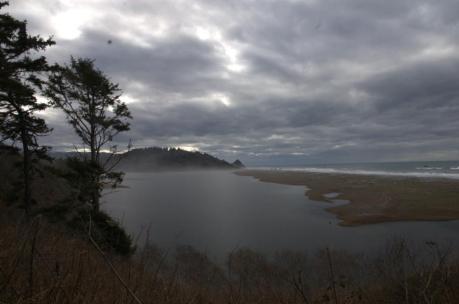
For this tour I decided to use this photo because of its somewhat challenging lighting.

original_raw

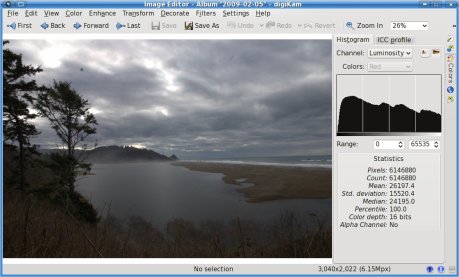
This is a RAW image taken with my old Pentax istDS*. This is how it looks in digiKam’s editor, which by the way exists as a standalone application as well called showFoto.

original_loaded

If you are familiar with histograms, you may have noticed that the histogram on this picture seems rather odd. The reason for that is that digiKam can show two different types of histograms, linear and logarithmic. The one displayed here is the logarithmic histogram, but most people are only accustomed to the linear type. One can switch between histogram types by clicking their respective little buttons above the histogram. Unfortunately, when clicking on the linear histogram button for this image all I get is a flat line. This is what digiKam’s documentation says regarding this:

“for images that contain substantial areas of constant color a linear histogram will often be dominated by a single bar. In this case a logarithmic histogram will often be more useful.”

I am sure there are technical reasons for this, but I do wonder why other programs, like Cinepaint, are able to show a linear histogram for this image just fine. I mention this because I know that some people do rely on the histogram a lot and I do think that the linear type is more useful. But I agree that having the logarithmic histogram is better than nothing. So, since this is not really a show stopper lets move on.

I am by far not a post processing expert. My normal work-flow when editing an image is to edit the levels, adjust the saturation, crop or resize, and then sharpen the image. So, lets try to do that with this image.

Levels

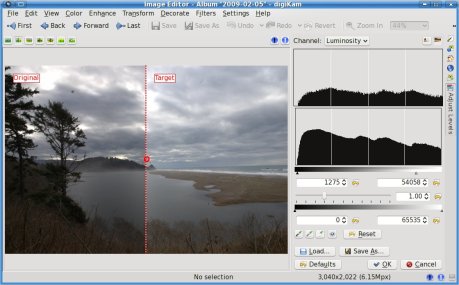
First lets use the levels tool found under Color > Levels Adjust.

01_Levels

I basically just added a bit of contrast by moving the left lever (below the second histogram) to the right and lighten the image by moving the right lever to the left. The preview window adjusts automatically as I make my adjustments so that I know what the result will be.

Saturation

Now, lets increase the saturation to try to bring out the color a little. For that we use the saturation tool found under Color > Hue/Saturation/Lightness.
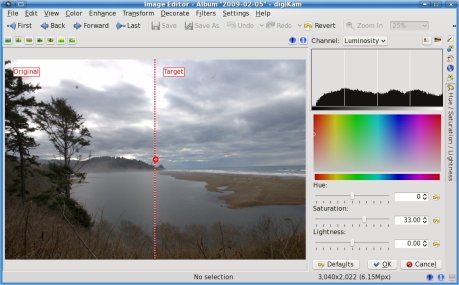
02_Saturation

I don’t like the “Disney” look that some point and shoot cameras default to with supper saturated colors. I like to keep my images somewhat realistic looking. So I don’t like to bump the saturation too much. I feel that, for this picture, that amount of saturation is just enough to give it a bit of life without going too far into cartoon land.

Cropping

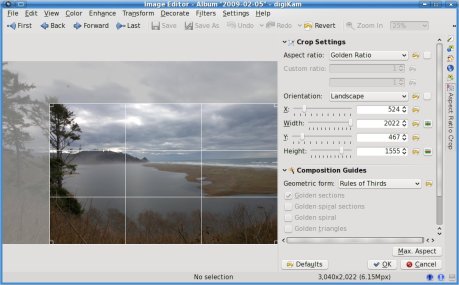
Now I am going to crop the image. This is really an important step if you are planing on printing the image. If you have ever taken your DSLR images to be printed without cropping them first, you may have been unpleasantly surprised by the fact that they were not centered correctly, or that an important part of the image was left out. The reason for this is that the image you gave them did not have the same proportions as the paper you asked them to print it on. And so they had to crop it for you. To prevent that from happening you need to crop your images to the same proportions of the paper you will be printing on. Yes, that means that you will need a different image if you want to print 8×10 than if you want 5×7, 14×20, etc. Fortunately, digiKam makes this step a breeze with its aspect ratio crop tool found under Transform > Aspect Ratio Crop.

03_Crop

As you can see I chose to use the “Golden Ratio” option for this image, but digiKam has predefined settings for all the common printing paper ratios in the market and even allows you to choose a custom ratio if you desire.

Sharpening

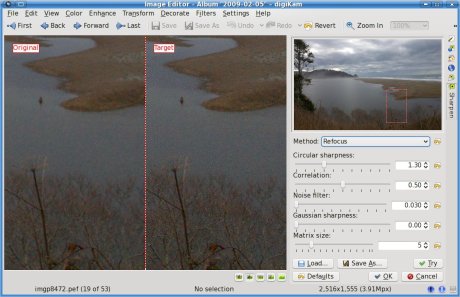
The final step in my photo processing work-flow is to sharpen the image. I am used to using the “Unsharp mask” method for this purpose, but in reading digiKam’s documentation I was surprised to learn that they actually recommend the “Refocus” method as a way to obtain better results. This is how the Sharpen tool looks like, found under Enhance > Sharpen.

04_Sharpening

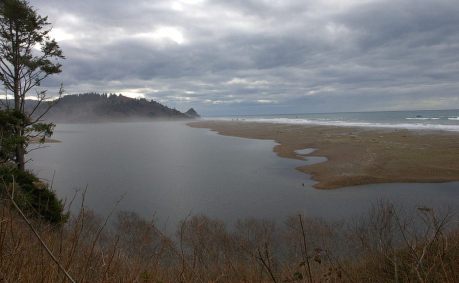
As you can see you can change the sharpening method used with a drop down button. You can zoom in to the image as much as you want using the Zoom button, and you can move the zoom window around in the small preview image above the settings area. I was conservative in the amount of Circular sharpness specified because I could see in the preview area that going for more would result in a lot of grain being visible. This amount improved the sharpness significantly while still retaining the smooth look of the overall image. This is my final result.

Final_Normal

As you can see, there is quite a bit of improvement over what we started with.

Auto-Correction

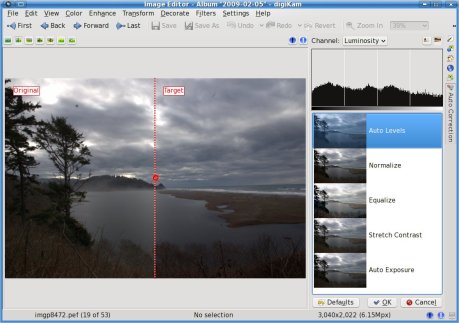
Normally I would have been content with leaving it at that. But since I am still in the exploring digiKam mode, I decided to test some of the Auto-Correction tools available. To do that, I went back to the original RAW image, and after importing it, I went straight into Color > Auto-Correction. This is what it looks like.

Auto-Correction

As you can see, there are five automatic correction levels that you can choose from to improve your image. In most images that I have tried this with, the Auto Levels option gives the best results. However, in this particular image the result was too dark. I had not seen any image for which the Equalize option resulted in an improvement, but for this particular image the results it gave me were surprisingly good. This is what the digiKam documentation says about the Equalize method of Auto-Correction:

Equalize: this method adjusts the brightness of colors across the selected image so that the histogram for the Value channel is as flat as possible, that is, so that each possible brightness value appears at about the same number of pixels as each other value. Sometimes Equalize works wonderfully at enhancing the contrasts of an image. Other times it gives garbage. It is a very powerful operation, which can either work miracles on a image or destroy it.

Well, looks like they were not kidding. My image turned out much better using this method of correction instead of my normal level adjustment step. This is how the image looks after adding saturation, cropping it, and sharpening it.

Final_Equalized

Conclusion

Without a doubt digiKam has a lot to offer for the photographers among us. Unfortunately, it still has one glaring omission – a clone tool. You may have noticed that the original RAW image had some dust specks in the sky above the trees and in other parts of the clouds. In digiKam, the only tool available for trying to remove such things (other than cropping them out as I did here) is a tool called In-painting, found under Enhance > In-painting. However, that tool is not easy to use and is rather slow. With a proper clone tool, as available in most other photo editors, removing such items only takes a few seconds. The good news is that the digiKam developers have acknowledged this omission as a bug and we can expect to see it implemented in a future version of digiKam. In the mean time we can use the Gimp to take care of these items as a final touch up step.

I think you will agree that digiKam is an amazing open source tool. It has now become my main photo editor. If you are into photography, why not give it a try?
26 responses

  1. Looks interesting, but as you said, without a full-featured clone tool (including edge softness and transparency) it is pretty useless for me. I also like the “replace colors” and selective color” tool in PS3+ which I find I am using more and more rather than making changes on the entire image. But I suspect this program works more effectively on the entire image rather than select areas.
    Djedi

  2. I’ve been using digiKam for digital asset management, and showFoto for 16 bit correction, for about 2 years now, and this software suite has really gone a long way. Yes showFoto lacks a few things, and based on the past I’m confident it will gain those things in the future, but currently my digiKam (including showFoto) + Gimp combination means I could get rid of Windows completely and enjoy the perks of a stable and configurable Linux 🙂

  3. > People who enjoy digital photography as a creative outlet are very familiar with software products from companies like Adobe, Corel, ACDSee, Bibble, Lightzone, and even Google.

    < Bibble is a product name, Bibble Labs is the company name
    Ligthzone is a product name , Light Crafts is the company name
    ACDSee is a product name, ACD Systems is the company name

    these are small things u will say, but that is exactly where open source mostly (with few exceptions) suxx – not polished it is…

    1. Point well taken. My apologies.

  4. I’m quite surprised to see no references to the super KDE graphics editor, Krita.

    1. I have played with Krita a bit. I like the fact that it has layers and masks. You can do some neat things with it. But, I am more into plain photography.

  5. Hiya,

    Great post! Well-written…

    There are so many crap-blogs on the net these days, it is refreshing to see one that reads so well and has a good structure.

    Thanks!

    D.

  6. “But, I am more into plain photography.”

    That is fine but, does Krita have the features that you like about digiKam? Your article would have been more complete if you have included Krita comparison.

    1. Krita is more of a painting program rather than a photo editor. Comparing it to digiKam or showFoto is like comparing apples to oranges.

  7. While it is true that Krita is a good tool for digital painting (as my girl-friend proves regularly), it is a capable photo-editing application as well. Making a reference to Krita is not more apples to oranges than mentioning the GIMP. Most Linux-based photographers have used the GIMP at one point or another for photo-editing and Krita is just another OSS photo-shop replacement.

    Unlike the GIMP, Krita can do 16-bit work and was developed with color management and multiple color-spaces from the beginning (CMYK). This makes Krita an excellent choice for advanced photo manipulations like HDR and the like. Past versions had (in my experience) some speed problems but I hope the newest updates resolve these problems.

    Most importantly, it has a clone tool, which is definitely useful.

    1. You know, when you said Krita had a clone tool I said to my self “I must have missed it”. So I loaded Krita and looked for that clone tool all over the place and could not find it. Note that in PCLinuxOS KDE4 the version of Krita available is version 2.0.1. Now, the tool may be there but I sure can’t find it. But, I then went and loaded my Fedora installation to see what version it runs and sure enough I found the clone tool on the older 1.6.3 version. So, maybe it has not been implemented on the new version yet. I am not sure.

      But, going back into whether I should have mentioned Krita in this review/tutorial, I still think that the article is better as is. The article highlights digiKam, including its photo editor. It aims to show how easy and intuitive working with it is. Its interface and tools are very well designed and implemented which make it efficient and a pleasure to work with. I don’t think I can say the same about Krita. However, there is quite a bit of overlap between Krita and digiKam, and Krita has some features that digiKam could use, so maybe that is why you want to see a comparison. I might make one one of these days. But, for today the spotlight is on digiKam.

      1. Because it’s not a tool. Tool in Krita are for controling your stroke not what is paint. The duplicate op is a paintop available in the combobox at the top.

        That said, despite being a Krita developer, I fully agree with the opinion that digikam is a better choice for a pure photographer, as long as all you are interested in doing is improving quality of your images.

      2. Cyrille,

        Thanks for dropping by. If I may, could you tell me how to select what the brush is copying from?

        Edit: Never mind. I figured it out: The shift key.

  8. Krita lacks basic features and is extremely slow. I hoped v2 would have fixed that but unfortunately it has not. That’s why I use showFoto for my 16bit needs (no problems whatsoever editing 16 bit per channel 20 000 x 10 000 pixel panoramas in showFoto… try that in Krita!) and then I go to the quick, stable and powerful Gimp to finish off post-processing.

    Back on topic, I think this article missed some important points, but all media exposure is good :]

    1. DrSlony,

      By all means, please share your knowledge. As I said, I am only now learning digiKam and I am definitely interested in learning more.

  9. Hmm I tried out digikam recently and it seemed quite awful — a confusing and baroque interface (basically they offer you _lots_ of options, without making it clear what’s important), very slow, and the processing tools seem to yield worse results than other converters. I was quite disappointed.

    Both rawstudio and ufraw seemed better than digikam, though neither of those those is perfect either; e.g., ufraw lacks sharpening but has really good NR, and rawstudio lacks NR (the dev version of rawstudio has NR, but it seemed to give much worse results than ufraw’s NR).

    Kind of annoying there’s no converter that actually does everything well…

    1. What do you mean by recently and which version did you try?

      “it seemed quite awful — a confusing and baroque interface (basically they offer you _lots_ of options, without making it clear what’s important)”

      🙂
      You sound like a Gnome guy. Gnome people usually balk at having too many options in front of them. I, on the other, hand like to have what I need at my finger tips. Different ways to work, that is all. I thought the interface of digiKam was rather good. Could you point out some examples of what you mean? I also had no performance issues at all.

      1. [yeesh, stop with the flamebait — I’m neither a “gnome person”, nor a “kde person”]

        I just started digikam again, to get some details of my complaints, but just got so frustrated (it took me ages to figure out just how to open a single image file [it basically doesn’t want to do that, it seems to want to manage your whole workflow without admitting that there are these “files” involved], it crashed twice, and then either hung, or simply took way too long doing NR filtering) that I don’t want to continue right now.

        ufraw and rawstudio seem so much more straightforward and clean though (even though the latter also kinda wants to do workflow management of a sort), it’s not even funny.

        I gather the whole “giant baroque app that tries to manage everything in a database” is popular though, because amarok is sort of the same way; frankly, I prefer something that lets me deal in familiar abstractions, like files…

        Version is 1.0.0-beta3 though.

      2. [yeesh, stop with the flamebait — I’m neither a “gnome person”, nor a “kde person”]

        🙂 No offense intended. I was just trying to point out that there are different tastes on interface design. For some people a lot of options in front of them is intimidating. For others, not having them is frustrating. Good thing we have options! No need to demean the option that you don’t like. Why not try to understand why some people like it instead?

        I just started digikam again, to get some details of my complaints, but just got so frustrated (it took me ages to figure out just how to open a single image file [it basically doesn’t want to do that, it seems to want to manage your whole workflow without admitting that there are these “files” involved], it crashed twice, and then either hung, or simply took way too long doing NR filtering) that I don’t want to continue right now.

        When you click on an image it shows you a preview. If you want to edit it, click on the Edit button. It took me like two seconds to figure that out. Not saying that you are not smart or anything, just that to some people it is not a problem. As far as your crashes, I have no idea what the problem might be. What distro are you using? Mine has been very solid.

        ufraw and rawstudio seem so much more straightforward and clean though (even though the latter also kinda wants to do workflow management of a sort), it’s not even funny.

        To each his own. When I tried ufraw I had a hard time with the size of the image area being too small. Maybe it is better now. But, at the moment, digiKam is working great for me and I am enjoying it so much that I am going back trough my whole collection of pictures and playing with them all over again. In particular, I am really enjoying the black and white conversion tool. But, again, to each his own.

    2. I agree. I found Digikam to be too buggy and unstable for professional work. The fact that it wants to act like a database is annoying too. My photo data base is over 1 terabyte which probably contributes to it’s stability issues.

      In all fairness, I use Ubuntu Studio on my workstation which uses gnome. Maybe Digikam works better on a KDE based distro, but on Ubuntu Studio, digikam is so frustrating that I gave up opening it even if it’s just to follow some of the suggestions in this article.

      It’s sad that Cinepaint is so poorly maintained, because 6 years ago it was far ahead of photoshop in terms of 16 and 32 bit editing, and support for hdi and exr.

      Sadly I still have to use photoshop cs4 in WINE which though not perfect is far less buggy than digikam. The raw editor works pretty good too.

  10. This is a well written article.
    Just one point about it, now the Gimp is undergoing integration of GEGL.
    The next stable release, 2.8 is going to come out in a half year or so.

    The next release, 2.10 WILL implement 16bit!
    Within two or three years, the Gimp with it’s new and shiny GEGL-engine (up to 32bit per component images) will be back in competition.

    In the meantime, all these other photo editors get some breathing space, which is on itself not a bad thing.

  11. If you don’t want an application to manage your pictures but just want to operate on one, please try showfoto, digikam little brother (In fact, digikam editor in a separate application).

  12. Doesn’t the use of Gimp in the final step mean dropping the 16-bit colour depth?

    1. Yes, but at that point the heavy parts of the photo processing, where you need the extra bits, is all done. Doing those final clone touch ups in the Gimp on a PNG, or even a JPEG, file doesn’t have any practical effect on the quality of the final image.

  13. When I first installed Digikam, I was excited inspite of the huge number of dependencies (full disclosure, I use gnome and openbox).
    Digikam worked fine on a small folder of files, but the moment I pointed it to my huge 2 terabyte archive, it choked, it burned, and then died a horrible death. Digikam has crashed and or stalled every single time I’ve tried to open it. I’ve installed it and reinstalled it several times and it is just unusable on my large archives. And I have a quad-core with 8 gig ram and a quadro fx 4500.
    I’m sad that digikam turned out to be so unstable because I really thought it had hope and I wanted it to be good.
    Maybe my experience would have been better with KDE, but at this time KDE is not an option I want to explore.

  14. Digikam is terriffic, but doesn’t work well in Gnome, at least on my box. When you install digikam into ubuntu, it brings with it hundreds of dependencies, a couple of which broke some of my other programs.

    Personally for my work, I need strong LAB and CMYK support, a liquid filter and usable warp tool, 64 bit support ( I work on really, really large images), and most importantly a good healing brush and stamp tool.

    Without these things, I’m still tied to PS CS4. However I do admit that digikam is a step up from gimp for me.

    I really wish I had programming skills, because I would love to pick up Cinepaint and rework it because I still think Cinepaint shows the most promise, especially if one could merge it with, digikam, krita, and a number of gimp plugins.

Leave a reply to rm42 Cancel reply

The author

It is not about common sense.

Cruising Penguin

Related posts

Blog at WordPress.com.